Adding Google Analytics 4 to your SharePoint Site
June 10, 2023
1 min
Before we start, the following needs to be installed in our development machine and its corresponding version.
yo @microsoft/SharePoint
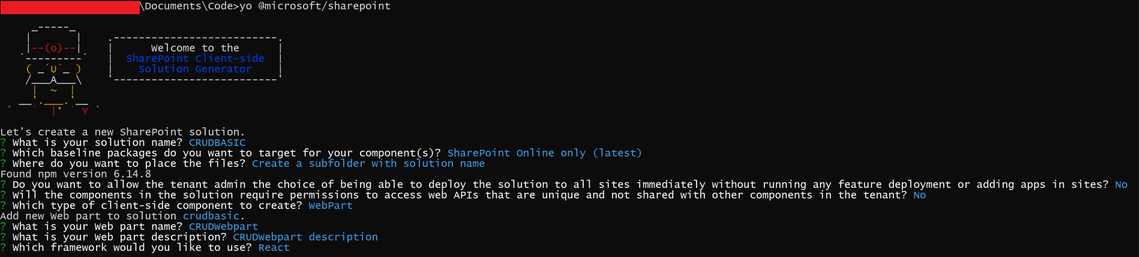
What is your solution name? CRUDBASIC
Which baseline packages do you want to target for your component(s)? SharePoint Online only (latest)
Where do you want to place the files? Create a subfolder with solution name
Do you want to allow the tenant admin the choice of being able to deploy the solution to all sites immediately without running any feature deployment or adding apps in sites? No
Will the components in the solution require permissions to access web APIs that are unique and not shared with other components in the tenant? No
Which type of client-side component to create? WebPart
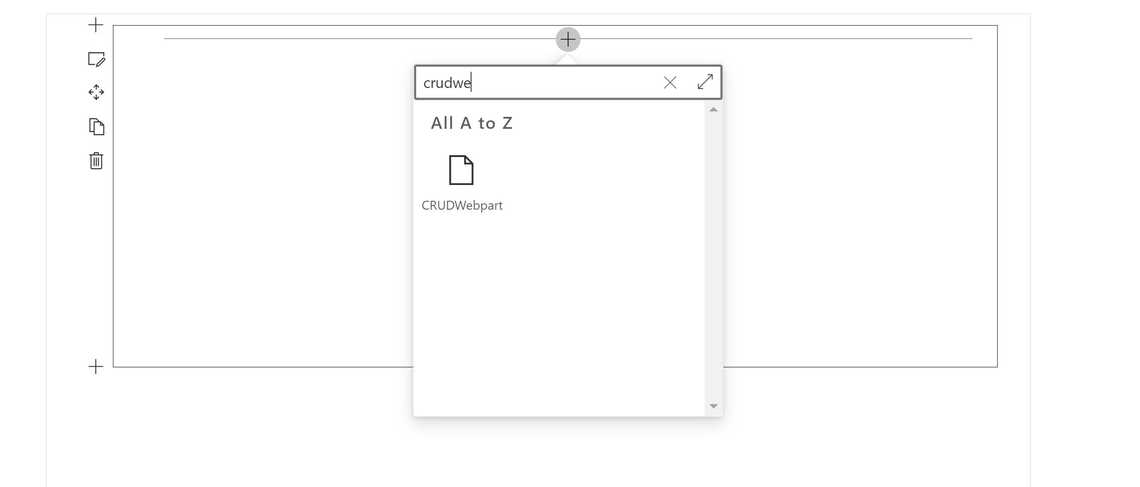
What is your Web part name? CRUDWebpart
What is your Web part description? CRUDWebpart description
Which framework would you like to use? React
Try to open the “CRUDBASIC” folder in your Visual Studio Code
Lets now try to install the PnPjs in our project, so in Visual Studio, let’s run the following
npm install @pnp/common @pnp/logging @pnp/odata @pnp/sp
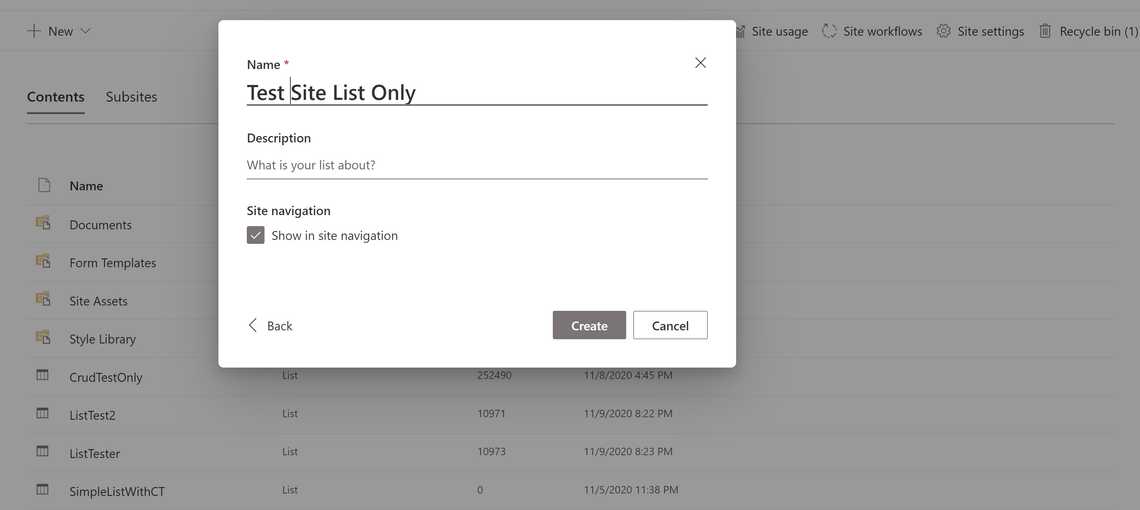
define([], function() {return {"PropertyPaneDescription": "Description","BasicGroupName": "Group Name","DescriptionFieldLabel": "Description Field",***"ListNameFieldLabel": "List Name" ***}});
declare interface ICrudWebpartWebPartStrings {PropertyPaneDescription: string;BasicGroupName: string;DescriptionFieldLabel: string;***ListNameFieldLabel:string;***}declare module 'CrudWebpartWebPartStrings' {const strings: ICrudWebpartWebPartStrings;export = strings;}
Now lets edit the “src\webparts\crudWebpart\CrudWebpartWebPart.ts” file. I made the following changes
import * as React from "react";import * as ReactDom from "react-dom";import { sp } from "@pnp/sp";import { Version } from "@microsoft/sp-core-library";import {IPropertyPaneConfiguration,PropertyPaneTextField,} from "@microsoft/sp-property-pane";import { BaseClientSideWebPart } from "@microsoft/sp-webpart-base";import * as strings from "CrudWebpartWebPartStrings";import CrudWebpart from "./components/CrudWebpart";import { ICrudWebpartProps } from "./components/ICrudWebpartProps";export interface ICrudWebpartWebPartProps {listName: string;}export default class CrudWebpartWebPart extends BaseClientSideWebPart<ICrudWebpartWebPartProps> {public render(): void {const element: React.ReactElement<ICrudWebpartProps> = React.createElement(CrudWebpart,{listName: this.properties.listName,});ReactDom.render(element, this.domElement);}protected onDispose(): void {ReactDom.unmountComponentAtNode(this.domElement);}// protected get dataVersion(): Version {// return Version.parse('1.0');// }public onInit(): Promise<void> {return super.onInit().then((_) => {// other init code may be presentsp.setup({spfxContext: this.context,});});}protected getPropertyPaneConfiguration(): IPropertyPaneConfiguration {return {pages: [{header: {description: strings.PropertyPaneDescription,},groups: [{groupName: strings.BasicGroupName,groupFields: [// PropertyPaneTextField('description', {// label: strings.DescriptionFieldLabel// }),PropertyPaneTextField("listName", {//label: strings.DescriptionFieldLabellabel: strings.ListNameFieldLabel,}),],},],},],};}}
export interface ICrudWebpartProps {// description: string;listName: string;}
We will now create a new folder called “services” under the “crudWebPart” folder. We will also a new ts file called “MainListApi.ts,” with the relative path should be “src\webparts\crudWebpart\services\MainListApi.ts”
To make it more organized, we will use “MainListApi.ts” to store all services we use for CRUD operation to our List. Now, let’s open the new file that we created and add the following code:
import { sp } from '@pnp/sp'import '@pnp/sp/webs'import '@pnp/sp/lists'import '@pnp/sp/items'import { IItemAddResult, IItems } from '@pnp/sp/items'const AddListItem = async (ListName: string): Promise<void> => {const iar: IItemAddResult = await sp.web.lists.getByTitle(ListName).items.add({Title: 'OldValueIsHere'})}const UpdateListItem = async (ListName: string): Promise<void> => {const lastItem: IItems = await sp.web.lists.getByTitle(ListName).items.select('Title, ID').top(1).orderBy('Modified', true).get()await sp.web.lists.getByTitle(ListName).items.getById(lastItem[0].ID).update({Title: 'My New Title'})}const DeleteListItem = async (ListName: string): Promise<void> => {const lastItem: IItems = await sp.web.lists.getByTitle(ListName).items.select('Title, ID').top(1).orderBy('Modified', true).get()await sp.web.lists.getByTitle(ListName).items.getById(lastItem[0].ID).recycle()}const ReadListItem = async (ListName: string): Promise<string> => {const lastItem: IItems = await sp.web.lists.getByTitle(ListName).items.select('Title, ID').top(1).orderBy('Modified', true).get()alert(lastItem[0].Title)return lastItem[0].Title}export { AddListItem, UpdateListItem, DeleteListItem, ReadListItem }
Now lets open our “src\webparts\crudWebpart\components\CrudWebpart.tsx” file and lets add the following code
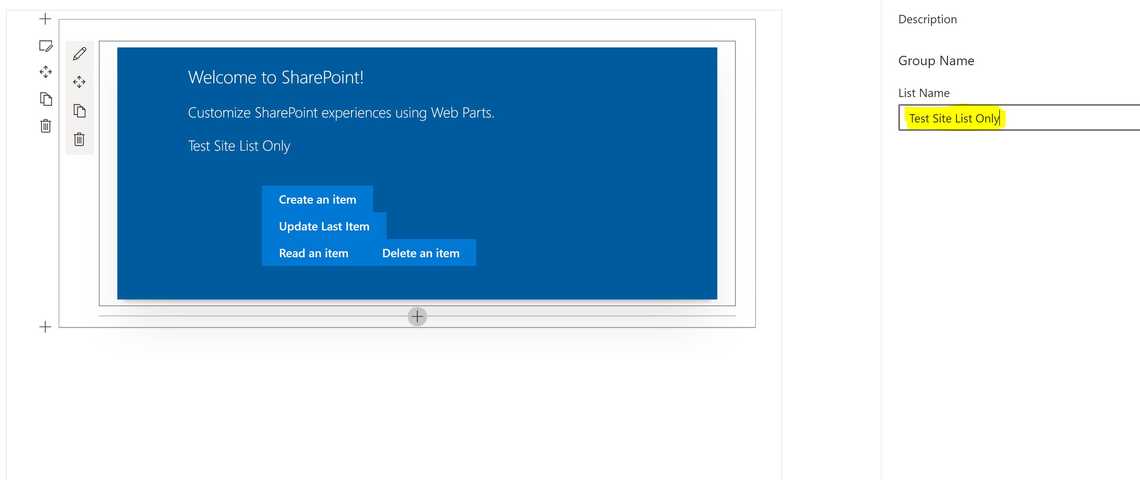
Line #5 - We reference the file(MainListApi.ts) we created earlier so that we can use the service and use it to make changes in our lists.
Line #30 - We added buttons that when we click different functions in our service file.
import * as React from "react";import styles from "./CrudWebpart.module.scss";import { ICrudWebpartProps } from "./ICrudWebpartProps";import { escape } from "@microsoft/sp-lodash-subset";import {UpdateListItem,AddListItem,DeleteListItem,ReadListItem,} from "../services/MainListApi";export default class CrudWebpart extends React.Component<ICrudWebpartProps,{}> {public render(): React.ReactElement<ICrudWebpartProps> {return (<div className={styles.crudWebpart}><div className={styles.container}><div className={styles.row}><div className={styles.column}><span className={styles.title}>Welcome to SharePoint!</span><p className={styles.subTitle}>Customize SharePoint experiences using Web Parts.</p><p className={styles.description}>{escape(this.props.listName)}</p><div className={`ms-Grid-row ms-fontColor-white ${styles.row}`}><div className="ms-Grid-col ms-u-lg10 ms-u-xl8 ms-u-xlPush2 ms-u-lgPush1"><ahref="#"className={`${styles.button}`}onClick={() => AddListItem(this.props.listName)}><span className={styles.label}>Create an item</span></a><ahref="#"className={`${styles.button}`}onClick={() => UpdateListItem(this.props.listName)}><span className={styles.label}>Update Last Item</span></a><ahref="#"className={`${styles.button}`}onClick={() => ReadListItem(this.props.listName)}><span className={styles.label}>Read an item</span></a><ahref="#"className={`${styles.button}`}onClick={() => DeleteListItem(this.props.listName)}><span className={styles.label}>Delete an item</span></a></div></div></div></div></div></div>);}}
We are now done with the changes in our code; we will now try our SPFx to our O365 Site collection.
Run the following code in your terminal
gulp serve
https://[MyO365Url]/sites/[SubSite]/_layouts/15/workbench.aspx